contact us

Use the form on the right to contact us.

You can edit the text in this area, and change where the contact form on the right submits to, by entering edit mode using the modes on the bottom right.


123 Street Avenue, City Town, 99999

(123) 555-6789

email@address.com


You can set your address, phone number, email and site description in the settings tab.
Link to read me page with more information.

used - sukasana.jpg

Blog


Filtering by Tag: yoga for core strength

Yoga for core strength and awareness part 4: your back

Olivia Marley

It feels a little weird to be talking about anything other than COVID-19 at the moment. But in my flow classes, which have continued online, I have been trying to keep consistency for my students by carrying on with the curriculum we were working on together in the studio. This blog post is a little late - it’s about content we’ve already covered in class - but I’m playing catch up a little with this blog after spending all my free time trying to get my tech for online classes sorted! What does that meme that’s going around at the moment say about ‘it’s ok to not be completely on top of things during a global pandemic’….?

So to continue our focus in class on core awareness, we next shift our attention to your back. Even though it’s mainly your lower back that’s in the area I consider your core, because your tissues all blend into each other (and you don’t move like a robot!) during this focus we were also feeling upper back, your bum, and your hamstrings (ie the back of your thighs) work. Here are some of the postures we’ve used, in the order they appeared in class:

Locust pose

@yogawitholivia locust pose

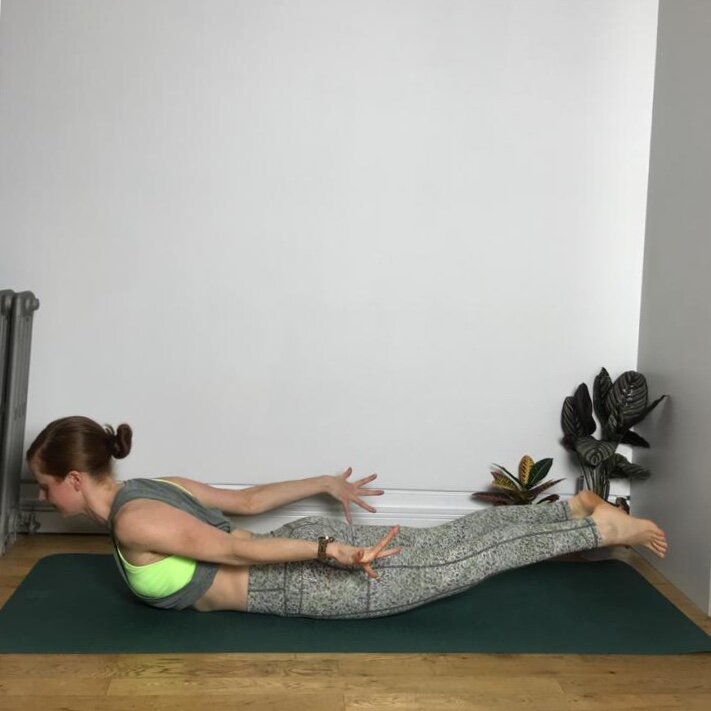
Lie down on your front and reach your arms back alongside your body. Lift your hands, chest and thighs away from the floor until you feel your back muscles switch on.

If this feels too much:

  • don’t lift up so high, or

  • just lift your upper body and lower it, then just lift your legs and lower them

To work harder:

  • Start with your palms facing in towards the sides of your body. Slowly turn your palms to the floor and just keep on turning them that same way until they stop. See if you can feel the backs of your shoulders switching on more

  • Without actually bending your knees, imagine there’s a heavy weight pressing down on your heels and you’re trying to lift your feet and bend your knees against that weight. With that imagined resistance you might feel the backs of your legs and your bum working harder.
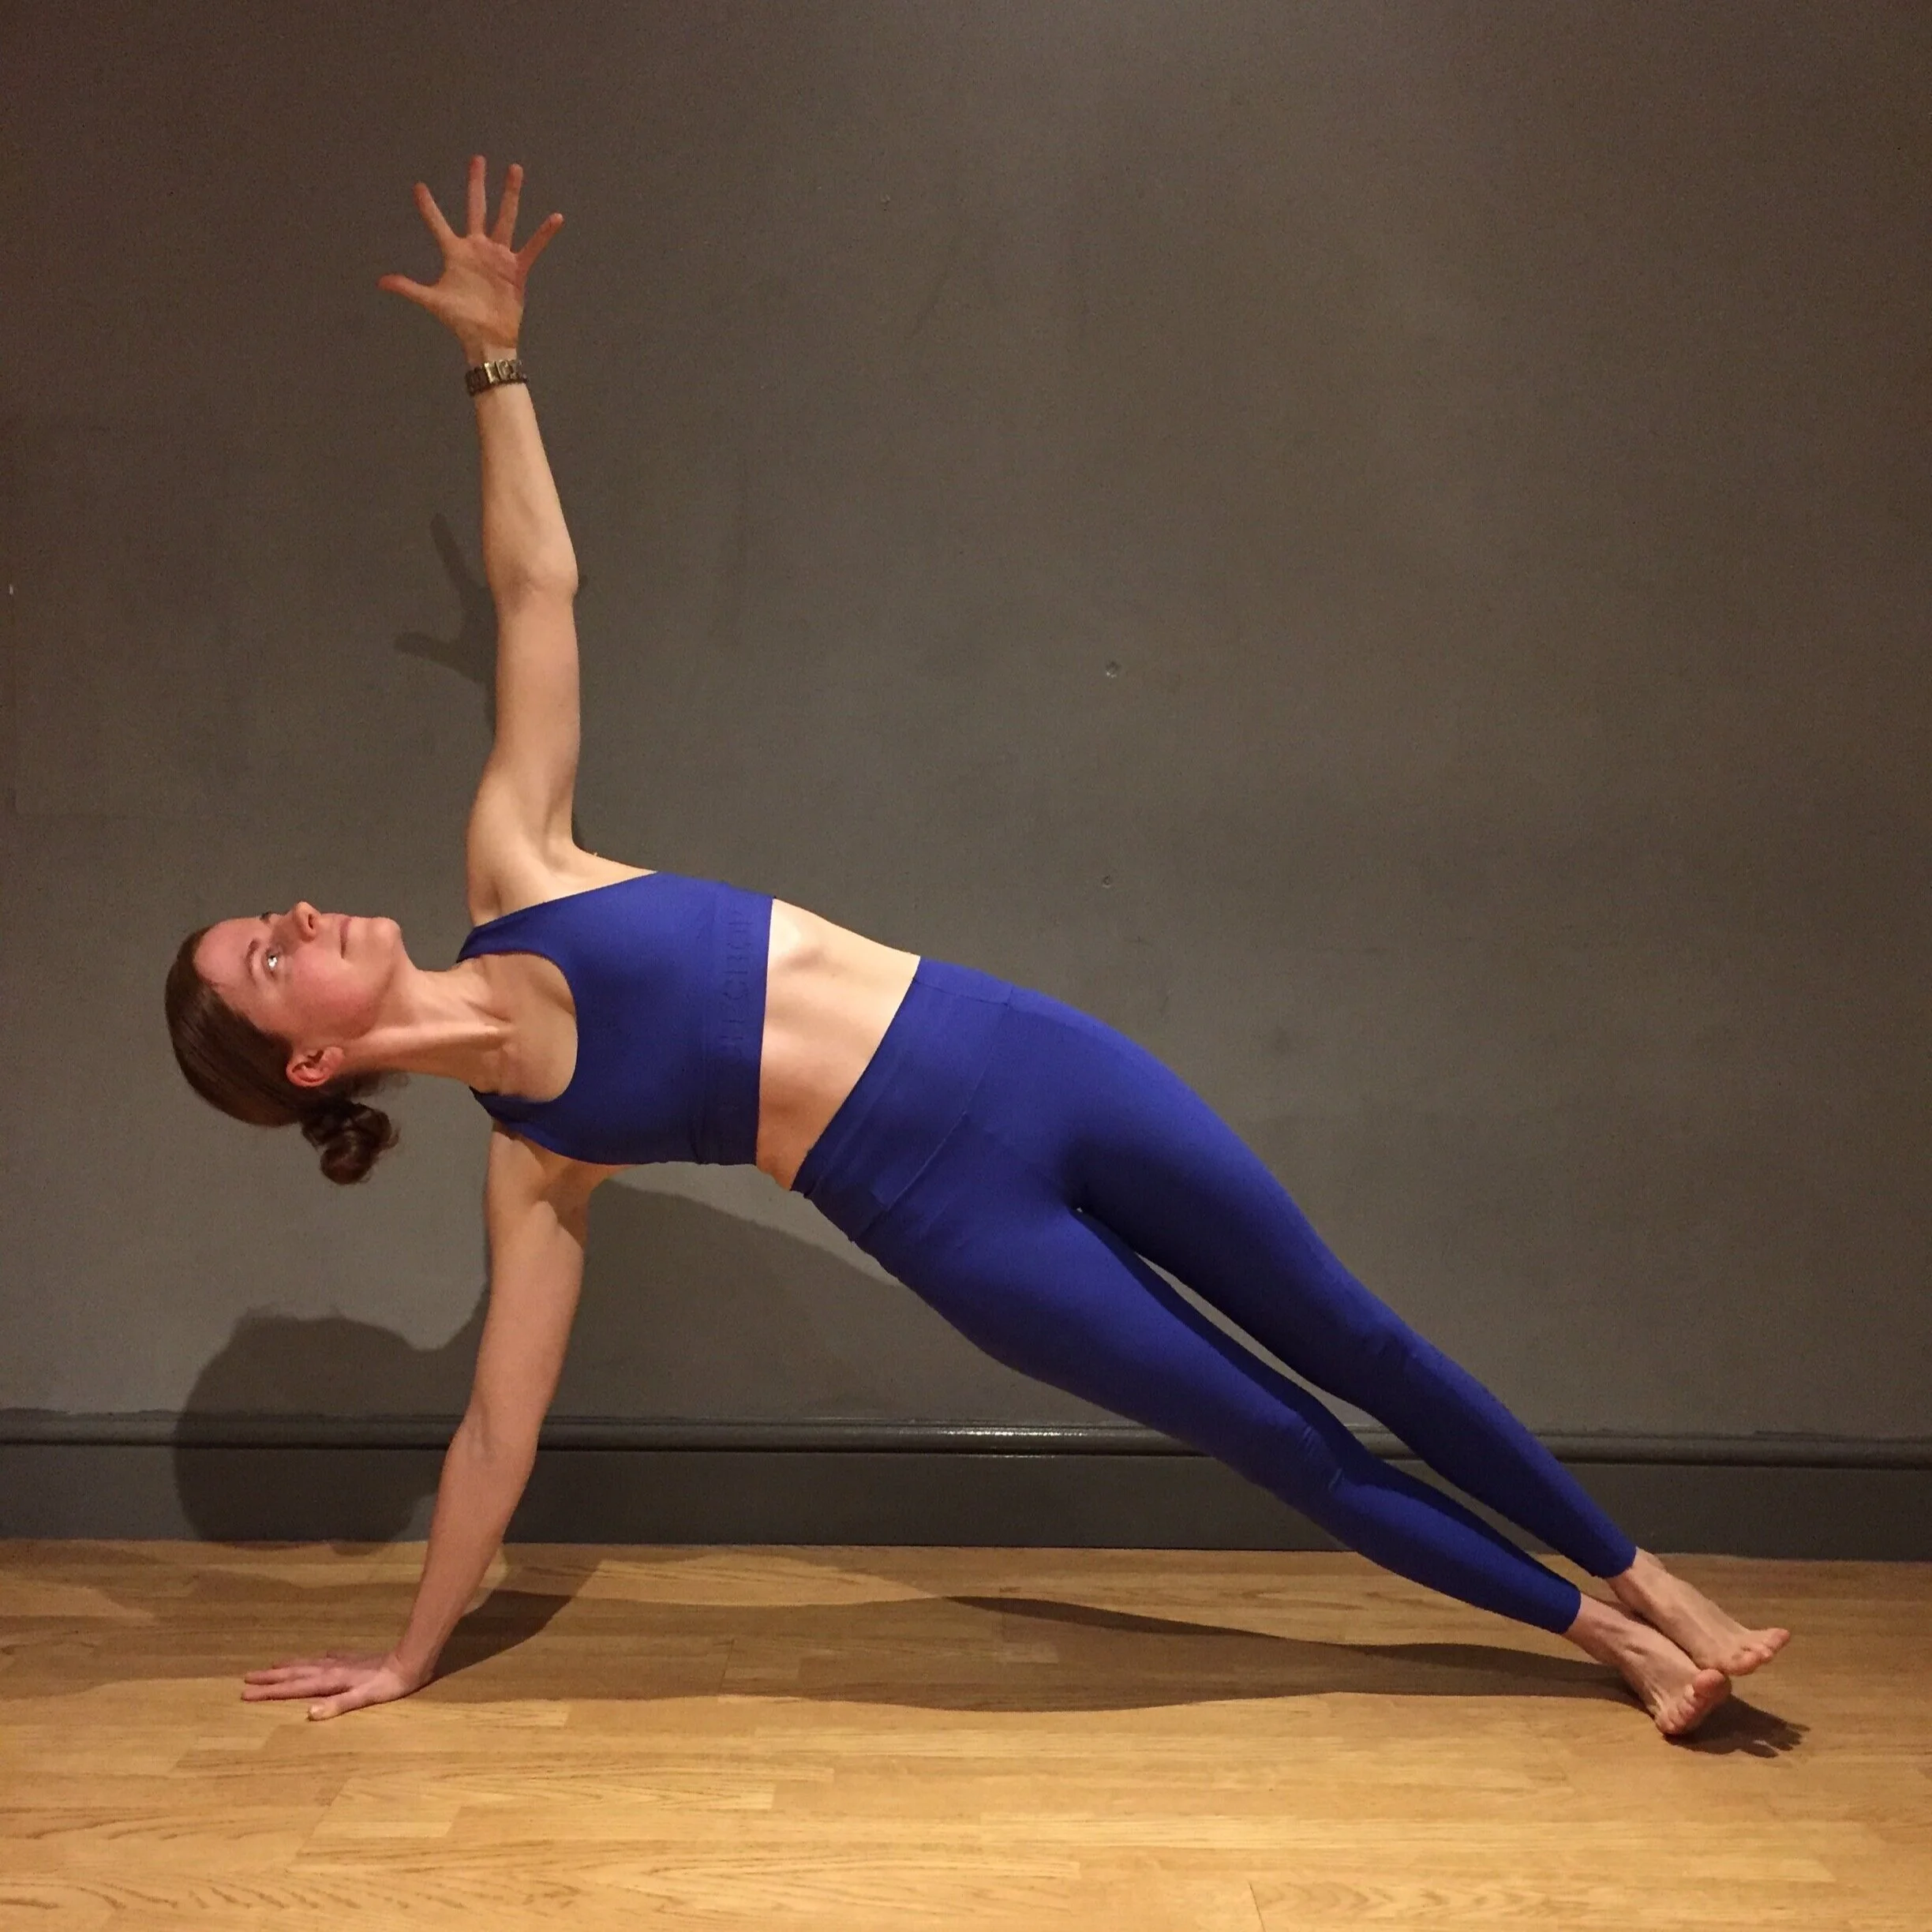
Warrior 3 variation

@yogawitholivia warrior 3 variation

I like to add a little backbend into warrior 3, as you can see in this photo, because it feels like it switches my back muscles on more (and helps counteract all the rounding forward we do from sitting so much!). In this variation I’ve got my arms in locust pose to also engage the muscles that draw my shoulderblades together and down my back away from my ears.

You can apply the ‘to work harder’ suggestions for locust pose to this posture too (except the tip about engaging your legs only applies to the top leg in warrior 3!).

Lunge with added hamstring strengthening

@yogawitholivia Lunge with hamstring strengthening

This pose is commonly practiced by reaching one arm back, grabbing your top foot and using your hand to pull your foot in. That’s a completely valid way of doing it and might create more stretch in the front of your thigh. Doing it the way shown here - without grabbing your foot - means your hamstrings have to do the job of bending your leg, so it’s a more strengthening version of the same posture. If this bothers your back knee, try putting some extra padding underneath it. And beware: this is quite strong for a lot of bodies so might make your hamstrings cramp!

Bow pose variation

@yogawitholivia bow pose variation

When you bend your knees in this pose you might feel your thighs drop down to the floor - keep trying to lift them! The same logic applies to this posture as to the lunge above: if you don’t use your hands to pull your feet in (which is the classic version of this pose) then your hamstrings and bum have to do the work of lifting your legs. You can apply this to any other backbends where you hold your feet (eg natarajasana or dancer’s pose).

Comment below if you have any questions!


yoga for core strength and awareness part 3: your sides (twists)

Olivia Marley

We’re continuing our look at core in class this week and staying working the sides of your body. Last week we were looking at side bends and side plank (vasistasana). This week we’ve shifted our attention to twists. The key posture we’ll be building towards is parsva bakasana or side crow/ crane pose.

There are a couple of different ways to do this posture – this video shows the variation that I find fires up my core muscles most and feels most buoyant once I’m in it. Differences from how you may have done this pose before include the placement of my hands; resting my hips on one arm not two; and the adjustment at the end to lift my feet higher. If you notice me pausing at different points in this video, the pauses align with the ‘steps’ I’ve written for you below!

The steps I go through in this video are:

  1. Start in a squat with your legs together, heels lifted and your hands in prayer. Then twist to your right and hook your left elbow on the outside of your right knee

  2. Take a couple of goes to get your elbow as far down the outside of your knee as you can. Holding your right thigh in place with your right hand might help you

  3. Keep pressing your left arm against your leg and place your left hand on the floor so that your fingers are pointing in the same direction as your toes. Place your other hand on the floor shoulder distance away from the first hand (not too close together!)

  4. Lift your hips

  5. Shift your weight over towards your right arm and bend your elbows to a chaturanga-like position (see a post here about the posture chaturanga dandasana if you’re not sure what it looks like!)

  6. Lean forwards until there is so much of your body weight forward of your hands that your feet start to get light and maybe lift

  7. If your feet lift and you feel steady enough, try to roll your top hip forwards (so for me here that would mean towards the camera). Feel how this creates more twist in your body and lifts your feet higher.

If you can't get through all of these steps first time don't worry. Just pay attention to which step you get stuck on, because that might tell you something about your body. For example, if it's hooking your elbow on the outside of your knee that's difficult, you might need to work on your twists and outer hip mobility to get into this pose. If it's lifting your hips up that's tough it might be a lack of core strength, or if you feel like your arms can't hold you it could be upper body strength.

As always - please just ask any questions that come up!

Yoga for core strength and awareness part 2: your sides (side bends)

Olivia Marley

Within our current class theme of ‘core’, this week we’re shifting our attention to your sides (look at our last post for a simple diagram of your core). As with last (and every!) week, our primary focus is on breathing plus also trying to feel the muscles in the sides of your waist working. For this week of study we’re looking primarily at how the some of the muscles in your core can make you bend to the side, and feeling how your outer hips also have a role to play in that motion. 

Here are some of the postures we’re using to feel those tissues working:

IMG_0088.jpg

Side ribs breathing: lie on your back with your knees bent. Put your hands on the sides of your lower ribs, so that your fingers are towards to the ceiling but your thumbs are wrapped around towards the floor. As you inhale try and breathe out into your hands, so that your ribcage pushes your hands further apart. As you exhale feel your ribs and hands sink back towards each other. Repeat.

IMG_0092.jpg
IMG_0095.jpg

Side waist strengthener: lie on your back with your knees bent. Lift your head and shoulders and reach your hands towards your ankles. Feel the front side of your core working to lift your head and shoulders. Take an inhale, then as you exhale reach your right hand towards the front of your mat (to bring yourself into a sideways bend). Inhale come back to centre, exhale reach to the other side. Repeat a few times, concentrating on feeling the side of your waist shortening to make your torso bend sideways as you reach your arm.

IMG_0101.jpg
IMG_0104.jpg

Lounge lizard to modified side plank: I’m not sure if the posture in the first of these images has a common name (but I call it lounge lizard!). Notice how both my feet are pointing in the same direction, which would be parallel with the short edge of my mat if I was using one. I’m also not sitting on the floor, my hips are hovering and I’m feeling a stretch along the outside of my bottom hip and in that side of my waist and ribs. Inhale into the bottom side of your torso, then as you exhale keep your feet as they are and push up into the version of side plank show in the next image. For extra length in the top side of your body you can reach your arm alongside your ear like. Move between these two postures a few times, in time with slow steady breathing.

IMG_0106.jpg

Side plank: you can see here I’m lifting my hips a little higher than they would be if my body was in a perfectly straight line. I like doing that because it feels like it works the side of my waist and outer hip more to lift me higher. Make sure your bottom shoulder stays happy by shrugging it down your back away from your ear.

@yogawitholivia bananasana

Again I’m not sure if this posture has a name - I’ve heard it called bananasana 🍌. Whatever it’s called, this is a nice gentle way to stretch out all the tissues in the sides of your body .