Svarga Dvidasana or bird of paradise pose
Olivia Marley
This is one of those postures that can look deceptively simple. And when someone has the type of body that can do it easily, it looks effortless. But for many people (myself included!) this posture is very demanding – it asks for your shoulders to be able to move in certain way, for a decent range of motion in your hips and a LOT of lower body mobility (particularly in the back, front and inside of your thighs). So make sure you include those parts of your body in your warm ups before attempting this posture. Once you’ve done that, try following these steps…
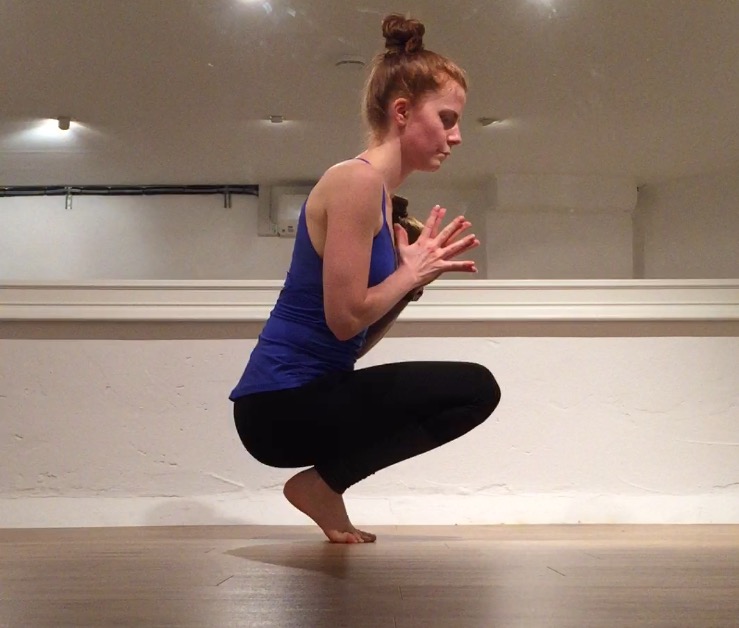
Place your feet a little wider than hip width apart. Sit halfway down to the floor into a squat (not all the way down like a yoga squat, more halfway down like you’d do in the gym (first photo above). Wriggle one arm underneath and behind your same side leg. So here I’m doing my right side (and these instructions will be for your right side). Take a couple of goes to get as much of your arm underneath your leg as you can. The more the better! If you can’t get your leg up past your elbow this may be the point that you need to practise for a while before moving on. Reach both arms out to the side and turn the palms of your hands to face behind you, and then maybe up towards the ceiling (second photo above). Turning your arms like this will make your shoulders move in a way that will make the next step easier.
Clasp your hands behind your back (first photo above). If you can’t clasp your fingers, hold a strap in your top hand and catch it with your bottom hand. If you can easily clasp your fingers, try holding your left wrist with your right hand (and when you work this on the other side, hold your right wrist with your left hand). Come on to the toes of your right foot and hop your right foot a little towards your left (second photo above).
Rather than using your upper body to drag your right leg up off the floor, instead use the strength your right leg to lift your upper body upright (first photo above). Notice if your standing leg wants to buckle; if so, straighten it as much as you can. If you can’t straighten your standing leg, just pause at this point of the posture and encourage your bottom leg to become straighter. If you can straighten your bottom leg, straighten your top leg (second photo above). Stand tall and take a few breaths up into your chest. To come out, use the strength of your leg to lower your upper body down to the floor then release your hands. Repeat on the second side. And ask if you have any questions!


![FullSizeRender[1].jpg](https://images.squarespace-cdn.com/content/v1/5372014be4b0db8de8ce9150/1505234886553-5A5Z0CUZWTT77VGA7YIE/FullSizeRender%5B1%5D.jpg)
![FullSizeRender[2].jpg](https://images.squarespace-cdn.com/content/v1/5372014be4b0db8de8ce9150/1505234989134-GA6ULNPPEP0G9VEC2KQ1/FullSizeRender%5B2%5D.jpg)
![FullSizeRender[3].jpg](https://images.squarespace-cdn.com/content/v1/5372014be4b0db8de8ce9150/1505234918261-DYVKOCANVR306PIJT2LU/FullSizeRender%5B3%5D.jpg)
![FullSizeRender[4].jpg](https://images.squarespace-cdn.com/content/v1/5372014be4b0db8de8ce9150/1505235033715-6JSOHXF4W3NMA9J4Q7W2/FullSizeRender%5B4%5D.jpg)
![FullSizeRender[5].jpg](https://images.squarespace-cdn.com/content/v1/5372014be4b0db8de8ce9150/1505235047304-QKWDWZPVC67AW2369TA8/FullSizeRender%5B5%5D.jpg)
![FullSizeRender[2].jpg](https://images.squarespace-cdn.com/content/v1/5372014be4b0db8de8ce9150/1504097174165-50A3IGSA38I8AT3TVWPD/FullSizeRender%5B2%5D.jpg)
![FullSizeRender[4].jpg](https://images.squarespace-cdn.com/content/v1/5372014be4b0db8de8ce9150/1504097197558-UR0X5JHNOIC7RJUXXW4Q/FullSizeRender%5B4%5D.jpg)

![FullSizeRender[1] copy.jpg](https://images.squarespace-cdn.com/content/v1/5372014be4b0db8de8ce9150/1504097315731-VZ2QEXH4J65MIQ9LH37B/FullSizeRender%5B1%5D+copy.jpg)
![FullSizeRender[2] copy.jpg](https://images.squarespace-cdn.com/content/v1/5372014be4b0db8de8ce9150/1504098432231-356VRANUBQG7DW6BUQOG/FullSizeRender%5B2%5D+copy.jpg)
![FullSizeRender[3] copy.jpg](https://images.squarespace-cdn.com/content/v1/5372014be4b0db8de8ce9150/1504098643177-O9CC9380WBSCUEN4AFRA/FullSizeRender%5B3%5D+copy.jpg)

![FullSizeRender[1].jpg](https://images.squarespace-cdn.com/content/v1/5372014be4b0db8de8ce9150/1504100207471-EDEIPBHFU513O9KC4FVO/FullSizeRender%5B1%5D.jpg)
![FullSizeRender[2].jpg](https://images.squarespace-cdn.com/content/v1/5372014be4b0db8de8ce9150/1504100427716-X3KLD7D2G6I97P4U301G/FullSizeRender%5B2%5D.jpg)
![FullSizeRender[3].jpg](https://images.squarespace-cdn.com/content/v1/5372014be4b0db8de8ce9150/1504100474653-ETOIWZQOUBL7QVE3AT0R/FullSizeRender%5B3%5D.jpg)
![FullSizeRender[4].jpg](https://images.squarespace-cdn.com/content/v1/5372014be4b0db8de8ce9150/1504101012230-H803ZR19U2NURMVZK9YE/FullSizeRender%5B4%5D.jpg)


