
Transitions: malasana (garland pose/ squat) to bakasana (crow/ crane pose)
Olivia Marley
The transitions we’ve looked in this series so far have been moving from standing on two feet to standing on one foot. In this way, we’ve been moving from a more to a less balanced pose. The transition this blog post is about takes you from being on your feet to your hands but in a way it’s still the same: moving from a more to a less stable posture. For each of the previous two transitions (if you missed them see my posts here and here) I cued my students to move slowly and minimise using momentum. We also made as much of the shape of the less stable pose as we could with both feet on the floor and made the transition simply about shifting your weight (ie not about launching yourself forwards or up). In that way, students (hopefully!) were able to tune in more closely to what was working to hold them steady, what was working to move them slowly, and maintain slow steady breathing. All that same work applied this week to shifting from a squatting position (malasana) to crow/ crane pose (bakasana).
We’d looked at trying to get into crow pose and hold it a few weeks before in class so I knew my students were familiar with this posture (see that week’s blog here). So this week, since we were approaching the same pose but as part of a transition, instead of holding it we were moving in and out of the pose in time with our breathing.
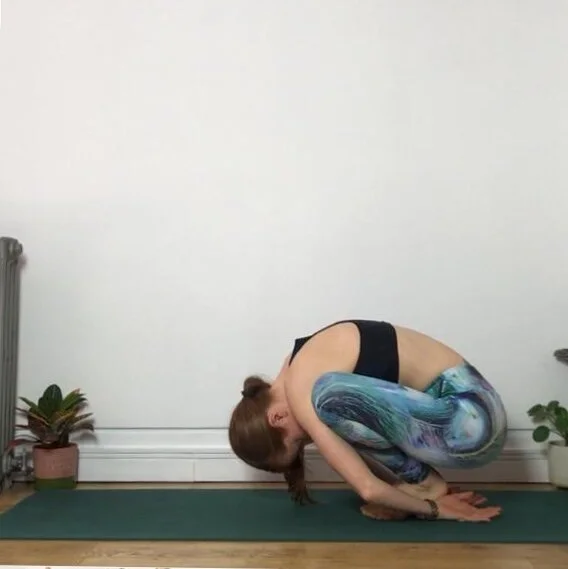
Start in malasana, or a relaxed squat. I’ve got my big toes together here and my knees apart, and I’m dropping my chest as low down between my legs as it’ll go. This means my knees are as high up towards my armpits as they can go (which will be useful as we progress towards the next pose).
Before you move on from here, squeeze your legs in against your upper arms. Keep squeezing them through all the steps that follow!
To get to this shape I’ve changed 3 main things from the picture above:
I’ve planted my palms on the floor in front of my feet and slid my hands back so my arms are pressing on my shins
Lifted my heels
Lifted my bum
In the introduction to this blog I talked about making as much of the unstable pose as you can with both feet on the floor. This shape looks like bakasana but we’re not quite there yet!

This is as much of bakasana as I can make with my feet on the floor. I’ve kept everything the same from the last picture (legs squeezing in, hips lifting high, fingertips gripping the floor) and now I’ve also shifted my weight forwards so it’s more over my hands. Arm balances aren’t about lifting up - they’re about getting in position and then shifting your weight forwards so that your feet can lift up.

You can see that everything in this photo is exactly the same as the last picture, except that I’ve bent my knees, pointed my toes and brought my feet to my bum.
Since we’re looking more at the transition rather than simply trying to hold this pose, this is how I was cueing my students:
‘Inhale come up on to your tiptoes (ie photo 3); exhale shift your weight forwards and lift your feet (ie photo 4); inhale hold there; exhale bring your toes back down again’. We went through that transition (photo 3-4) and back again three times. Please ask if anything is unclear!
